

Create a Kubernetes Cluster
This guide explains how to create, manage, and customize Kubernetes clusters using Edka.
Prerequisites
Before creating a cluster, ensure you have:
- An Edka account (sign up here)
- A Hetzner Cloud account and API token. See how to create them in our Prerequisites page.
- Basic understanding of Kubernetes concepts (helpful but not strictly required)
Basic configuration
In the Edka dashboard, click on Clusters in the main navigation, then click the Create Cluster button.
Cluster Name
Choose a descriptive name for your cluster (e.g., “production”, “staging”, “dev”). This name will be used to identify your cluster throughout the platform.
Region Selection
Select the Hetzner region closest to your users or applications:
- Germany: Nuremberg (nbg1), Falkenstein (fsn1)
- Finland: Helsinki (hel1)
- USA: Ashburn (ash), Hillsboro (hil)
- Singapore: Singapore (sin)
Cluster size
Feel free to adjust the cluster size to your needs. By default, Edka provisions a single instance control plane and one worker node. Usually the minimum necessary to run development and testing environments and in some situations even production workloads. You’re free to scale up the control plane and create as many worker nodes as you need.
Hetzner Cloud limits the number of nodes with a private network to 100. If you need more nodes, you can enable public networking.
More information about the private network limits in Hetzner Cloud can be found in the Hetzner Cloud documentation.
For larger clusters, we recommend using public networking and enable Cilium host firewall with CNI encryption. When Cilium host firewall is enabled, you can create up to 500 nodes per node pool.
Control Plane Configuration
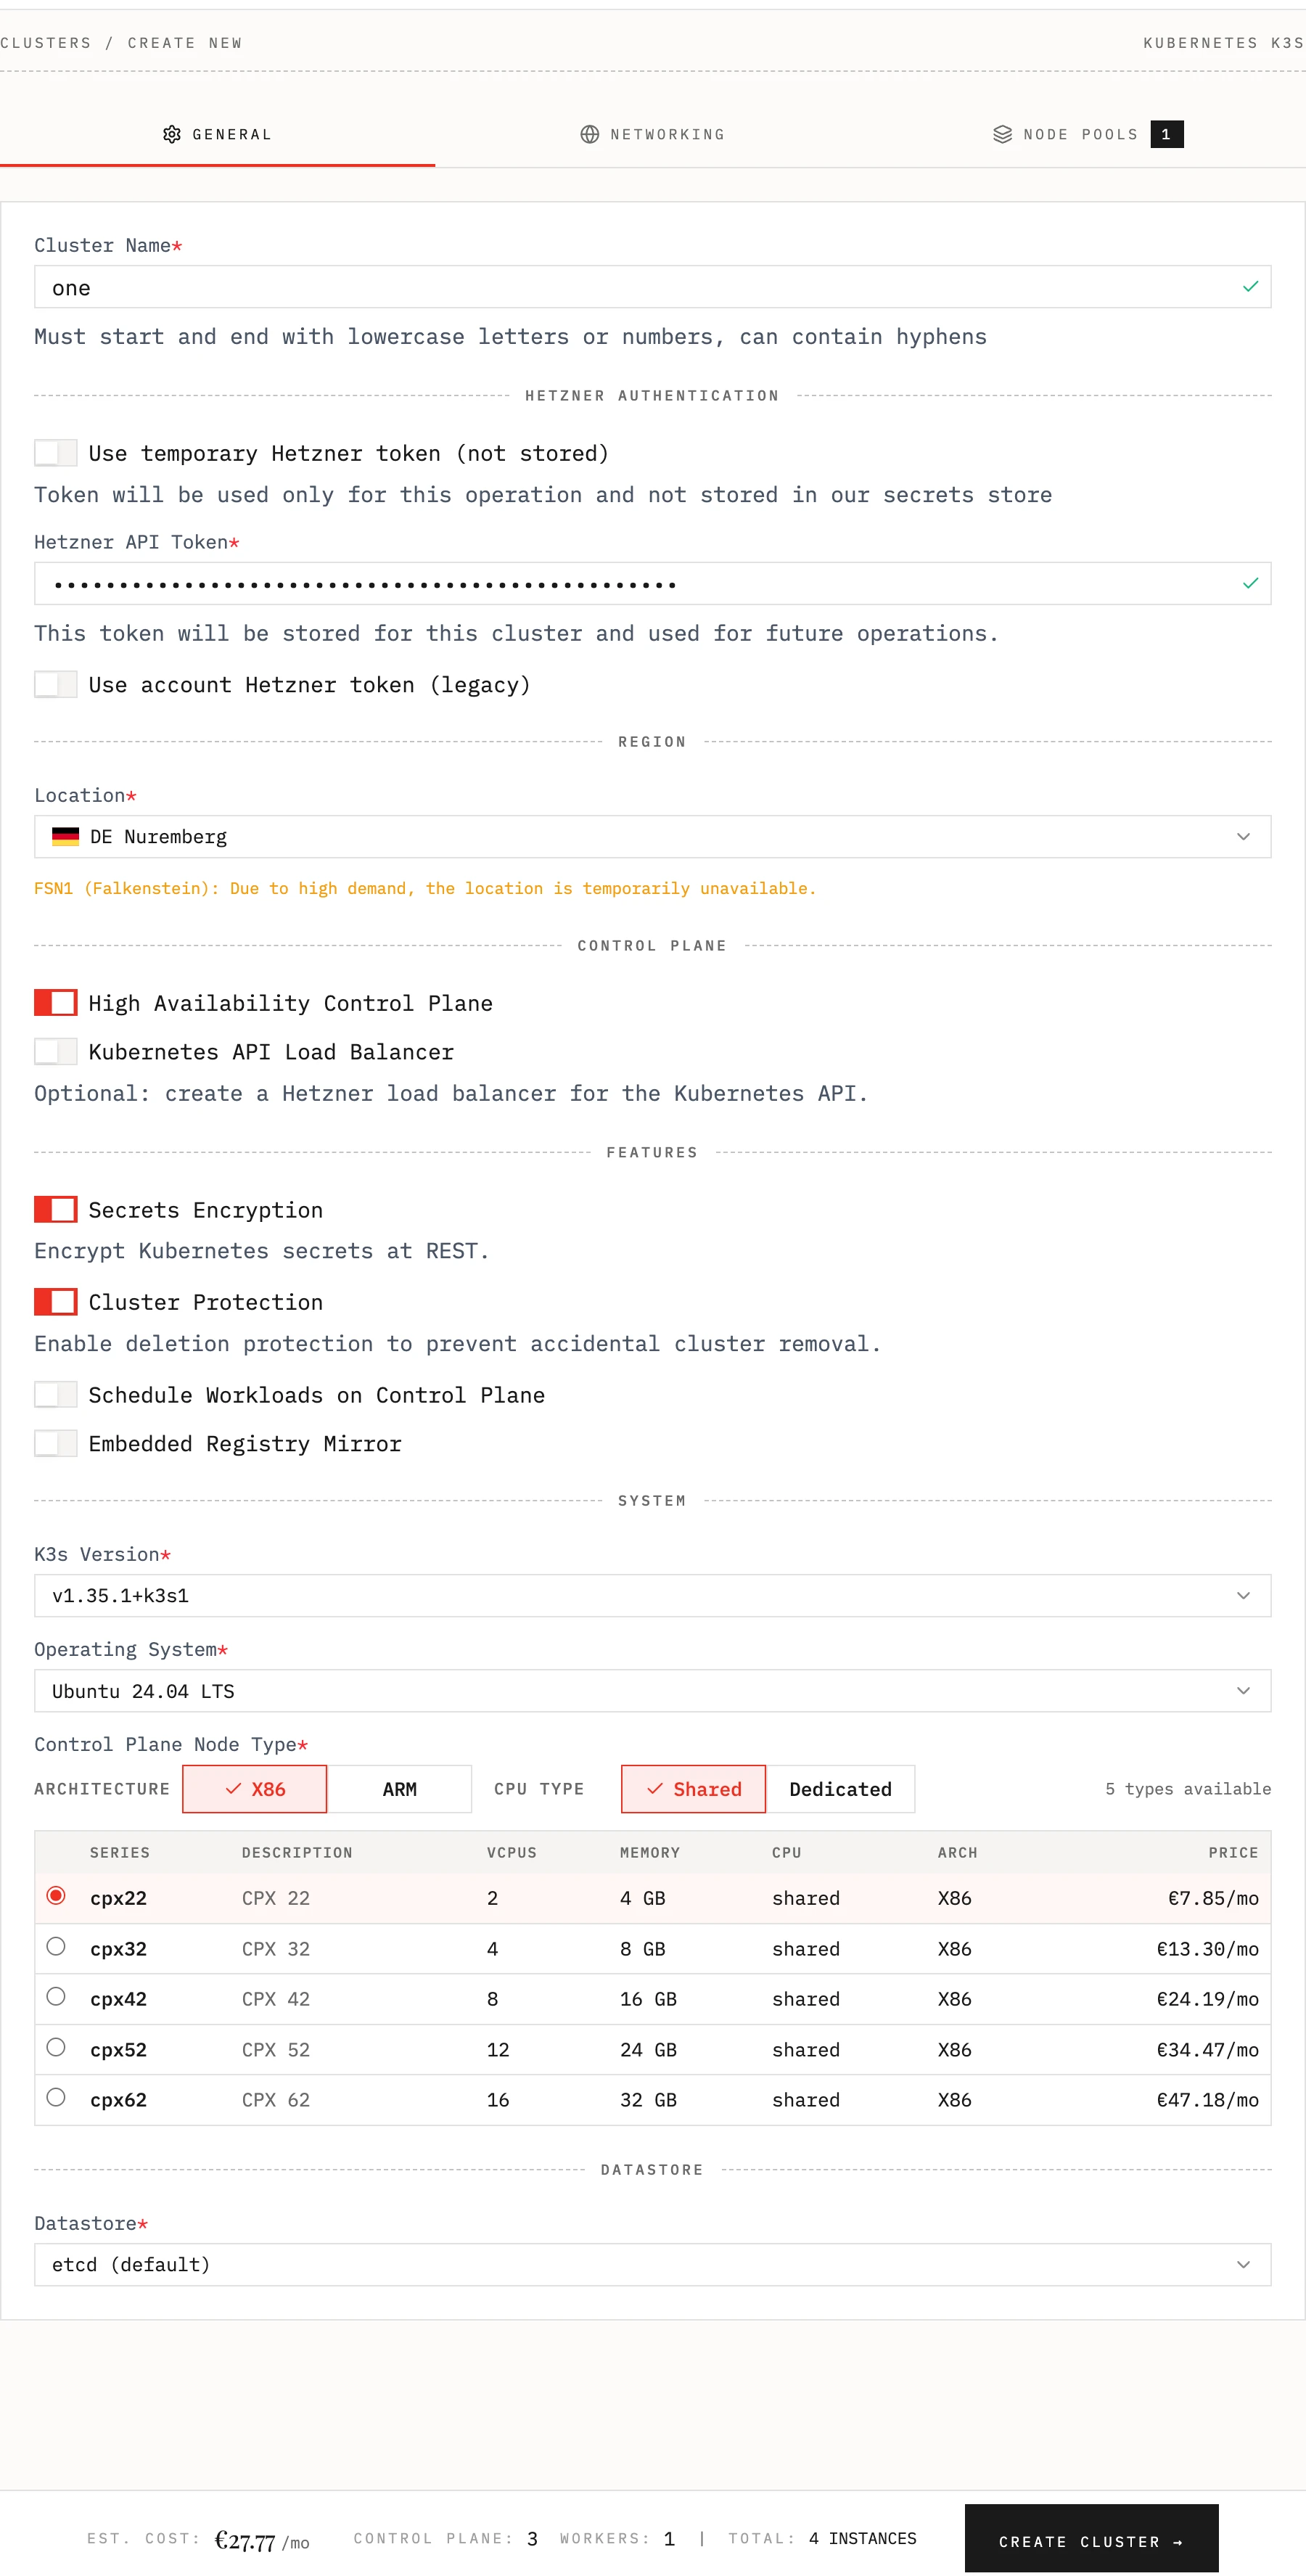
Kubernetes Version
Select the Kubernetes version for your cluster. Edka uses the k3s distribution of Kubernetes and usually supports the latest stable version. You can find more information about the latest k3s releases on the official k3s repository. If you need support for a specific version, please contact us.
Hetzner Token
When creating a cluster, choose how Edka should access Hetzner:
- Store token for this cluster (recommended): Edka encrypts and stores the token for this cluster and uses it for future operations. You can update or remove it in Settings > General.
- Use temporary token (not stored): The token is used only for the current operation. You must provide it again for future operations.
Note: The account-level integration in Settings > Integrations > Hetzner (Legacy) gives you more flexibility to create and manage clusters without always having to provide a token and is recommended for testing and development purposes.
After a cluster has been created, only the cluster owner and organization owners/admins can set, update, or remove the stored cluster token.
Cluster operations requiring a Hetzner token
- Creating a new cluster
- Updating cluster size
- Upgrading Kubernetes version
- Deleting a cluster
- Enabling cluster autoscaler
Cluster Protection
Enable deletion protection to prevent accidental cluster removal. It can be disabled later in the cluster settings by the cluster owner or an organization owner/admin.
High Availability Control Plane
Choose your control plane setup: The Control Plane is managing your Kubernetes cluster state and is the single point of failure for your cluster. If you need high availability, you can opt for a highly available control plane (3 instances). You can aslo add a Load Balancer in front of your Kubernetes API to distribute the traffic between the control plane instances.
- Single Instance: Development and testing environments
- High Availability (3 instances): Production environments (recommended)
Secrets Encryption
Encrypt Kubernetes secrets at REST. Enabled by default. Secrets stored in etcd are encrypted at rest using AES-CBC with PKCS#7 padding.
Schedule Workloads on Control Plane Nodes
You can schedule workloads on the control plane. This is useful for development and testing environments and we do not recommend running production workloads on the control plane.
Embedded Registry Mirror
K3s embeds Spegel, a stateless distributed OCI registry mirror that allows peer-to-peer sharing of container images between nodes in a Kubernetes cluster. You can learn more about it in the k3s official documentation.
Operating System
You can choose between official Hetzner OS images for Ubuntu 24.04 (default), Debian 13 (Trixie), Rocky Linux 10, Fedora 43 and Alma Linux 10. We plan extending this list with support for openSUSE MicroOS, Talos and Fedora CoreOS. Selcted operating system will be used for both the control plane and the node pools.
Control Plane Node Type
Specify the type of the control plane node depending on your workload requirements. Make sure you choose a node type that is compatible with your application.
Note: Arm64 architecture with Ampere® Altra® processors are only available in Germany (nbg1 and fsn1) and Finland (hel1).
Please refer to the Hetzner Cloud pricing page for the latest available node types available on each region.
Datastore
You can opt to store your cluster state in an embedded etcd or use an external database.
Etcd
The default etcd datastore for K3s.
External Database
The following external datastores are supported:
- etcd (certified against version 3.5.21)
- MySQL (certified against versions 8.0 and 8.4)
- MariaDB (certified against version 10.11, and 11.4)
- PostgreSQL (certified against versions 15.12, 16.7, and 17.3)
For more informations on the supported datastores, please refer to the K3s documentation.
Networking
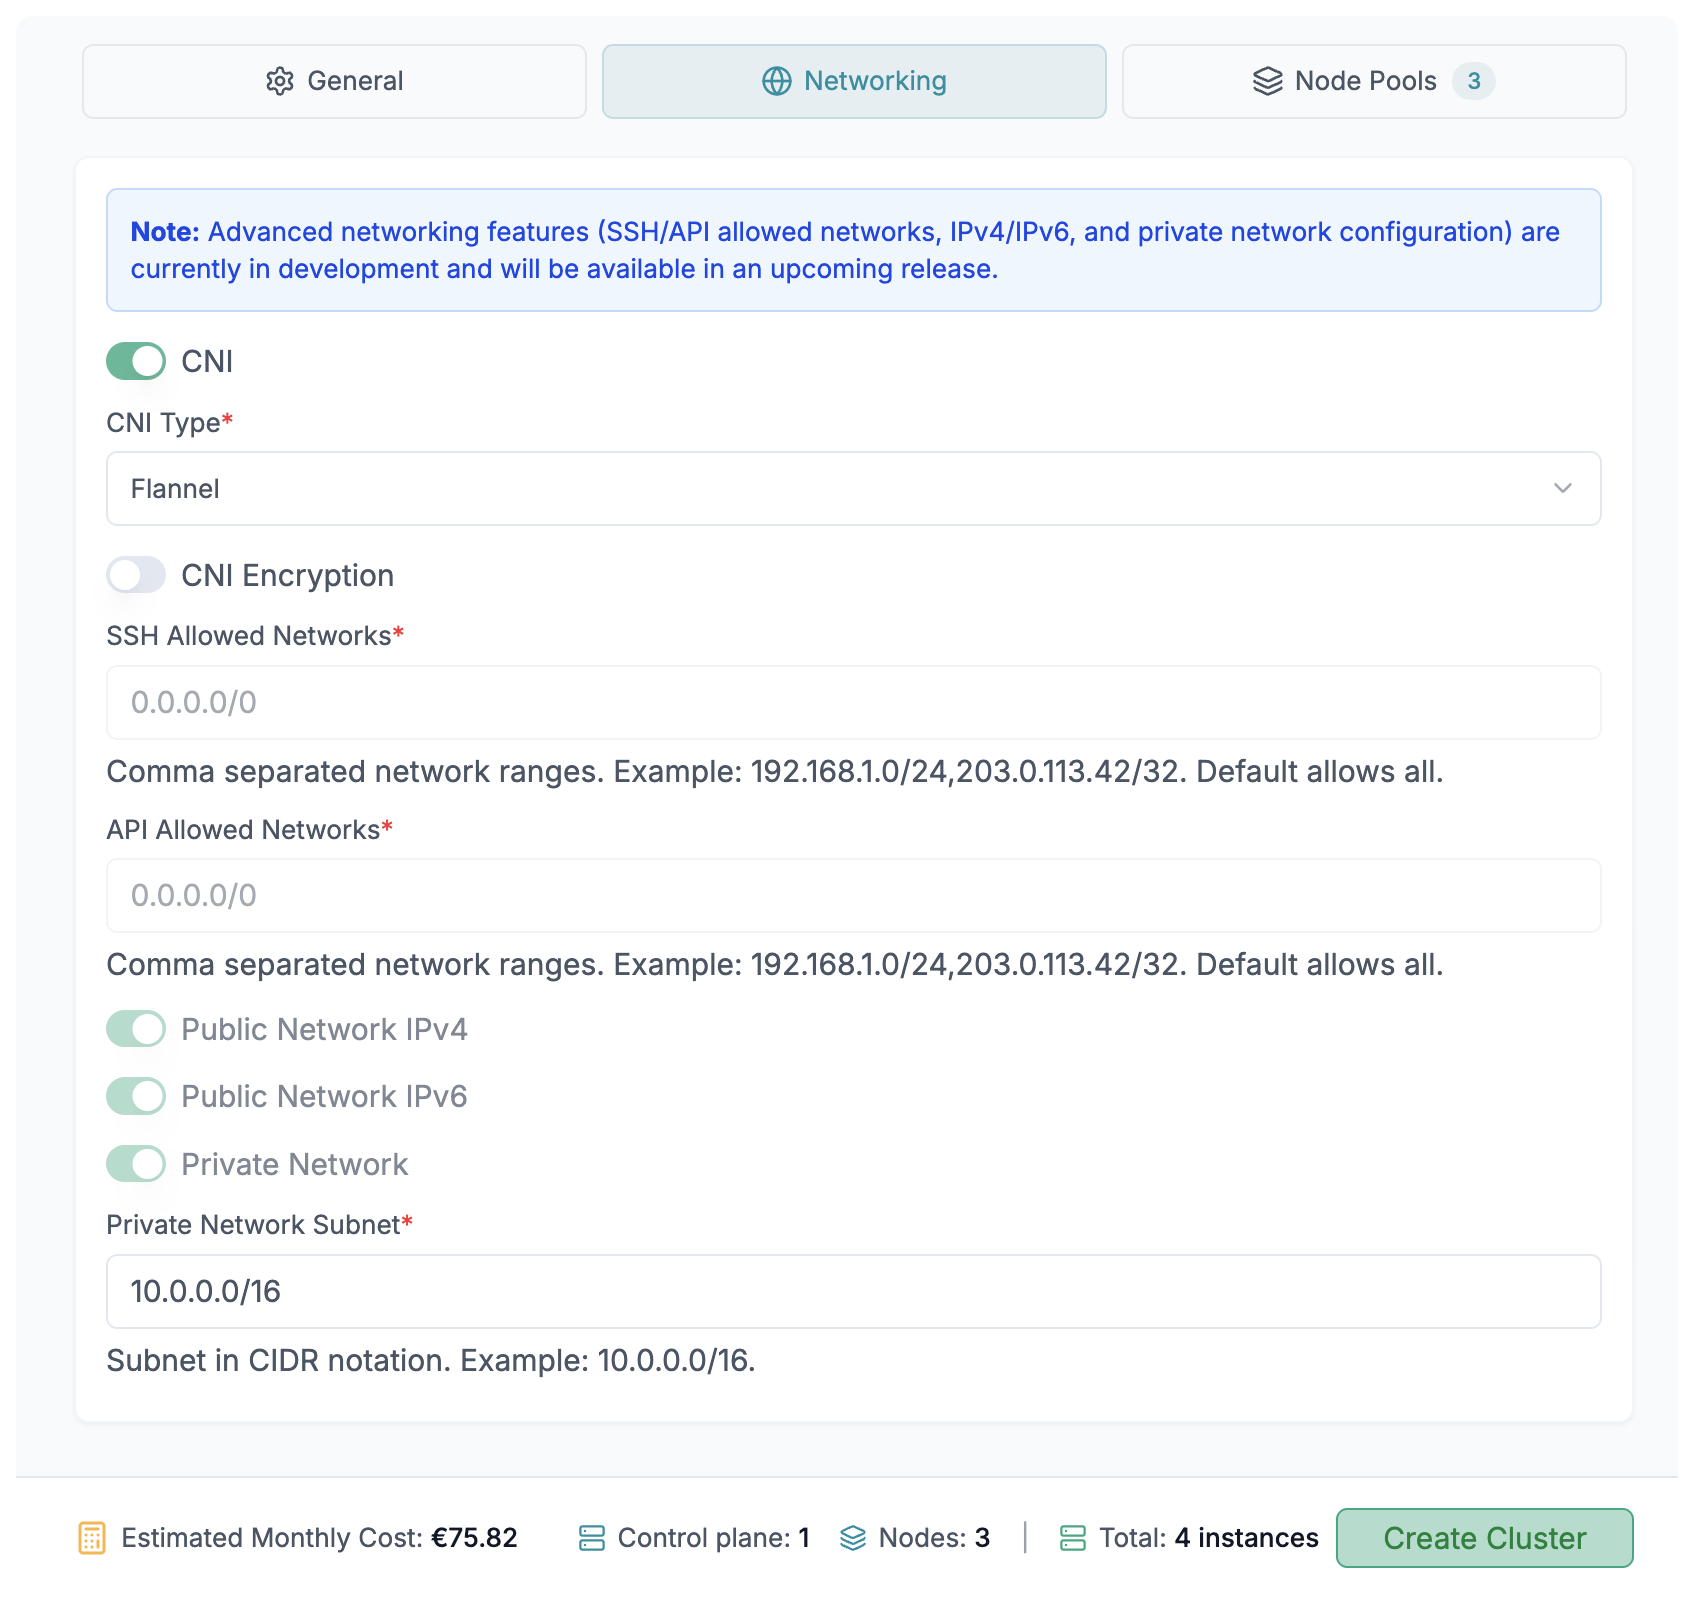
CNI Selection
CNI (Container Network Interface) is responsible for managing the network connectivity between the nodes in the cluster.
Flannel (default)
- Pros: Simple, low overhead
- Cons: Basic features; not scaling well on large clusters
- Best for: Small and medium clusters, straightforward networking
Cilium
- Pros: eBPF based, high performance, rich policy and observability
- Cons: Heavier and more operationally complex
- Best for: Medium to large clusters, strong security/visibility needs
CNI encryption
You can encrypt the traffic between the nodes in the cluster. This can be useful for nodes that are not part of a private network.
SSH and API Allowed Networks
You can specify the IP addresses that are allowed to access the nodes in the cluster via SSH and the Kubernetes API.
- Accepts comma or space-separated IPs/CIDRs.
- IPs without a CIDR are treated as
/32(IPv4) or/128(IPv6).
Example: 203.0.113.10, 203.0.113.11/32, 198.51.100.0/24
Note: To be able to access the Kubernetes API and provion your nodes, Edka injects its own NAT gateway IPs for cluster management access.
- If you use private networking, these rules are applied at the Hetzner firewall.
- If you enable Host Firewall, these rules are enforced by Cilium host firewall.
- If you disable private networking without Host Firewall, the API is exposed publicly (0.0.0.0/0 and ::/0).
Host Firewall (Cilium)
Host Firewall enables the Cilium host firewall to protect node-level ingress without relying on Hetzner private networks. It is recommended for larger clusters (Hetzner private networks have a 100 node limit), but can be enabled for any cluster size.
When enabled, Edka forces:
- public networking (private network disabled)
- Cilium as the CNI
- CNI encryption enabled
Edka also applies a Cilium host firewall policy to restrict SSH and API access using the allowed networks you specify (see above).
Public/Private Network configuration
By default, Edka provisions a private network for the cluster and also assigns public IPs (IPv4 and IPv6) to the nodes in the cluster. IPv6 can be disabled if you do not need it.
Private Network Subnet
You can specify the subnet for the private network. The default is 10.0.0.0/16. If you plan to deploy multiple clusters in the same Hetzner Project, we recommend using a different subnet for each cluster, but idealy you should use a different Hetzner Project for each cluster.
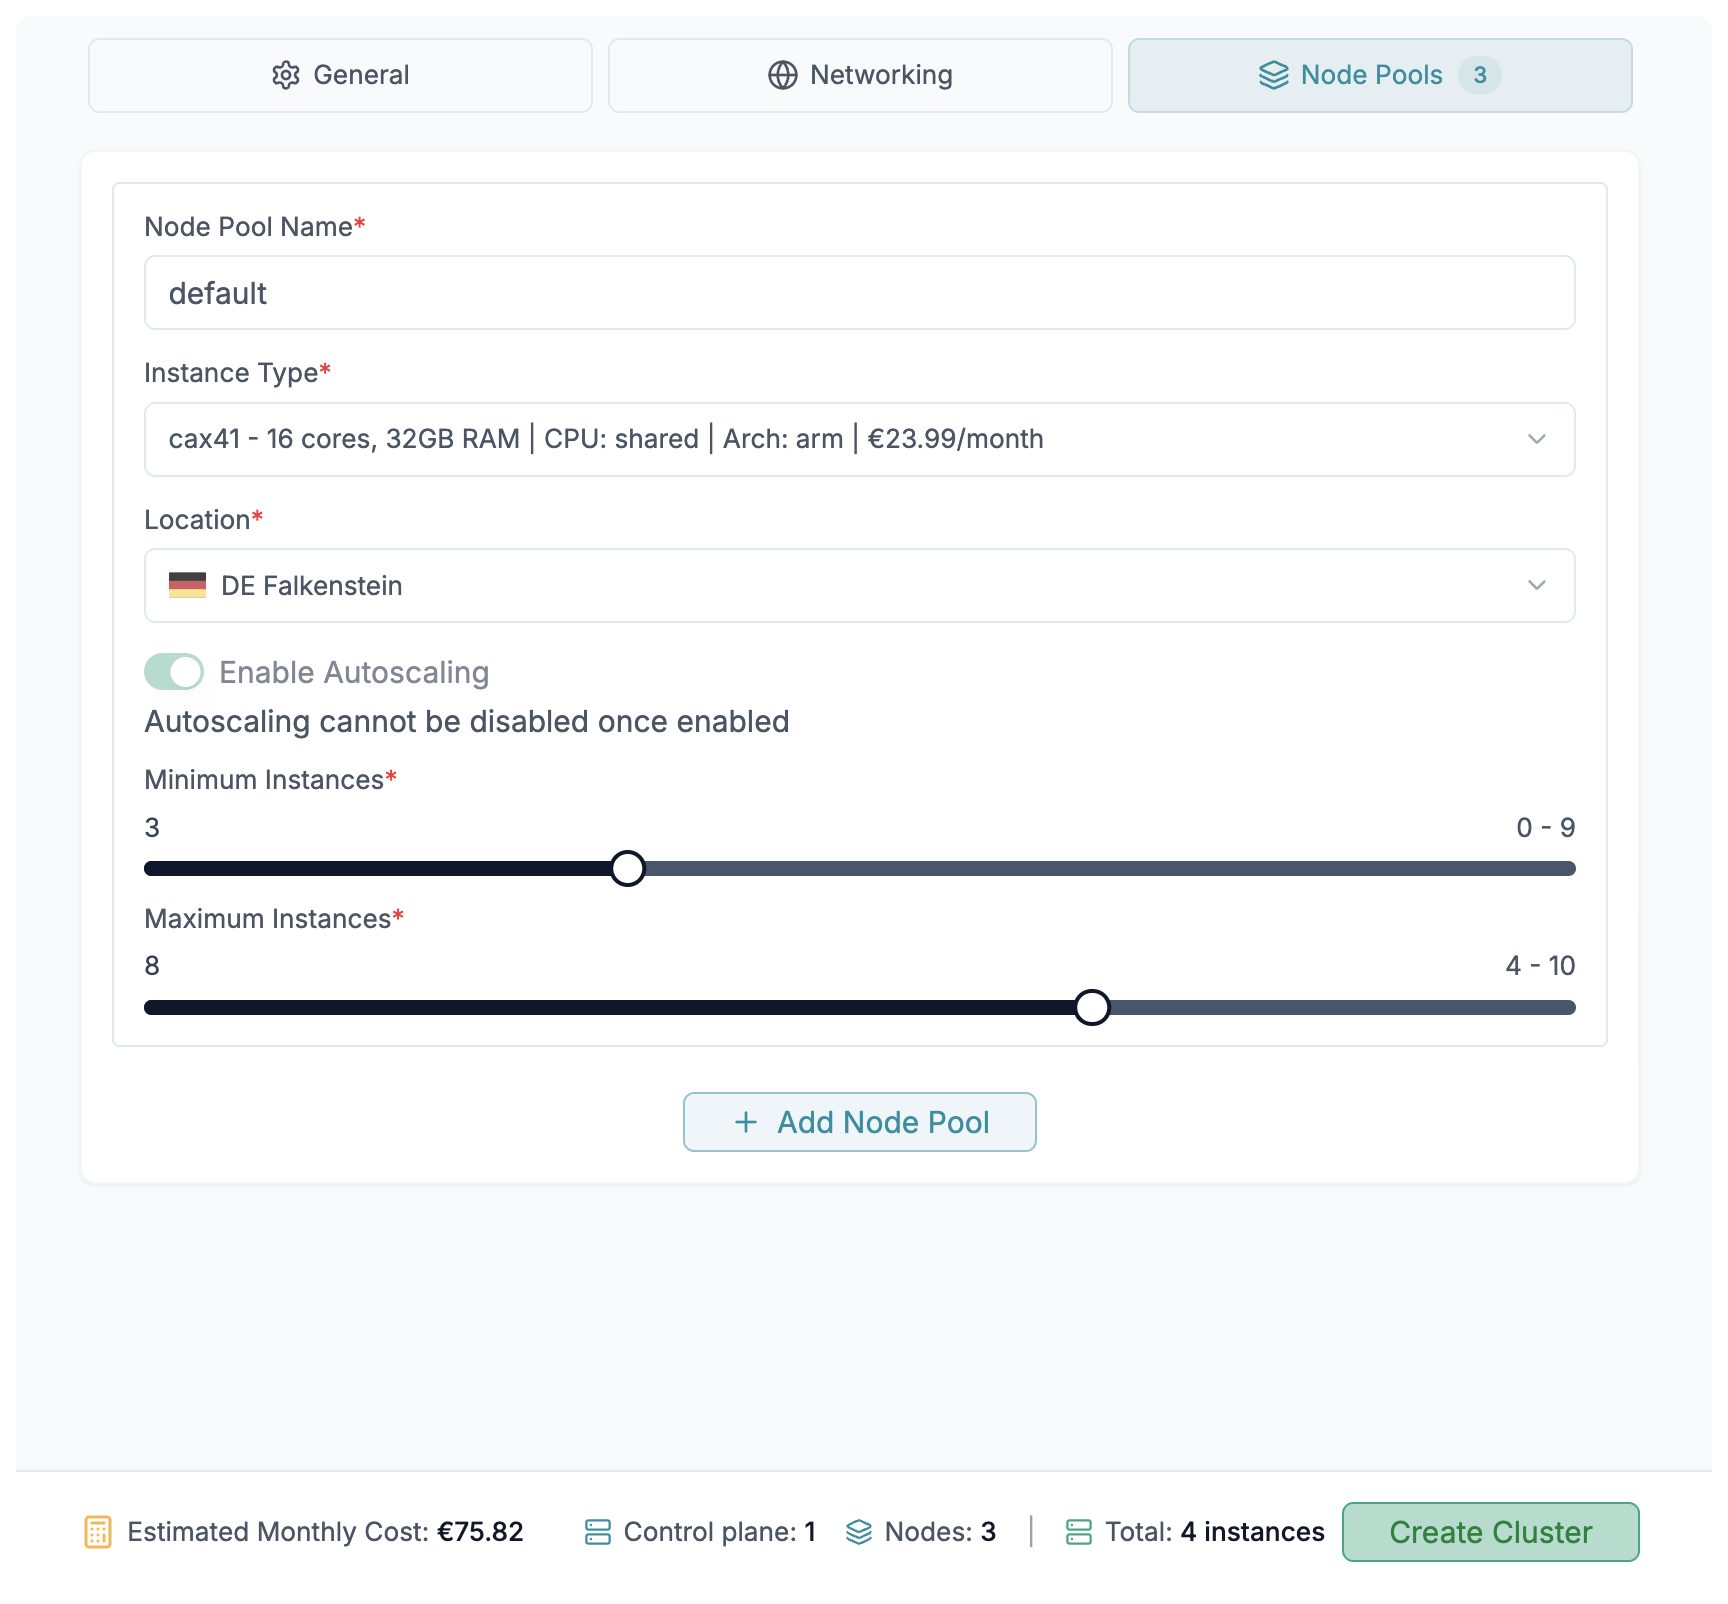
Node Pools
Configuration
You can specify the name for the node pool, the type of the node and the number of instances you want to provision in the node pool, up to 50 nodes per node pool when using private networking. When using public networking with Cilium host firewall, you can provision up to 500 nodes per node pool.
Autoscaling
You can enable autoscaling for each node pool. This will automatically scale the number of instances in the node pool based on the workload. You can specify the minimum and maximum number of instances in the node pool.
Extra Node Label and Taints
You can specify extra node labels and taints for each node pool. This can be useful to schedule workloads on specific nodes or to prevent workloads from being scheduled on specific nodes.
Example:
example.com/node-pool: "my-node-pool"For more information on node labels and taints, please refer to the Kubernetes documentation.